10004 Quarry Hill Place · Kitchen → Garage Wall · Updated March 2026
EXPANSION INTO GARAGE
12" → 36"
current depth → walk-in depth
Current Depth
12"
reach-in only
New Depth
36"
+24" into garage
Width
54"
4.5 ft opening
Height
~120"
10 ft ceiling
Side Shelves
10"
deep, both sides
Back Shelves
14"
deep, full width
Aisle Width
34"
54 - 10 - 10
Garage Used
9 sq ft
of 706 sq ft garage
What this project is
The kitchen pantry currently sits against the shared kitchen/garage wall with only 12" of depth — barely enough for one row of cans. It's between the laundry/mudroom entry (to the left) and the oven (to the right) on the kitchen's west wall. This project has 9 options: from a simple 24" bump-out to a full pantry room build. The garage (706 sq ft) can spare the space. There are also options that don't touch the garage at all — integrating pantry shelving into the existing laundry/mudroom (12' × 8'2", 98 sq ft!) or installing pull-out cabinet systems in the kitchen.
Key Constraints
🔥
Fire Code — Type X Drywall
The shared garage/living wall requires 5/8" Type X drywall on the garage side per IRC R302.5. Non-negotiable — inspector will check this.
🏗️
Load-Bearing Check
The kitchen/garage wall appears to be a partition wall based on the floor plan, but verify before removing any studs. A structural engineer consult is ~$300 and worth it.
❄️
Insulation Required
The expanded section is essentially garage-temperature. The ceiling, floor, and outer walls of the bump-out need spray foam or batt insulation. Colorado winters will freeze uninsulated pantry goods.
⚡
Electrical
LED strips are low-voltage (12V) and can run off a plug in the pantry — no permit needed if an outlet already exists nearby. A hardwired light fixture will need a permit.
🚪
Door Header
A 54" opening needs a proper LVL or doubled 2×10 header. If keeping the existing framing width, may be able to reuse the current header — depends on what's there.
✅
Garage Space to Spare
The 3-car garage is 38'8" × 22'2" = 706 sq ft. A 24" × 54" expansion takes only ~9 sq ft — less than 1.3% of the garage. No functional impact on parking.
Four approaches — from a simple bump-out to an L-shaped corner pantry that uses the garage's back corner (as shown in your garage photo).
OPTION A — Minimal
Simple Bump-Out
54"W × 24"D · +12 sq ft into garage
Simplest, fastest build
Minimal garage impact (~12 sq ft)
U-shape shelving, very functional
Can't walk inside — reach in only
34" aisle is tight
OPTION B
True Walk-In
54"W × 36"D · +18 sq ft into garage
Fully walk inside — comfortable
Step stool fits inside
More total shelf space
More framing/insulation work
~$1,200–2,000 materials
OPTION C — Best Value ✓
Wide T-Shape Walk-In
~96"W total × 24"D · 54" door opening
Same 54" door opening — no bigger hole in kitchen wall
Interior is ~8 ft wide — dramatically more shelf space
Extensions stay well clear of mudroom door
Much more storage than a straight rectangle
Wider framing box needed inside garage
Some extra framing cost for side wings
OPTION D — Premium
T-Shape + Wine/Bev Wing
T-shape + dedicated wine rack + bev fridge on one side
Everything in Option C plus a showpiece wine/bev area
Glass door or open shelves on wine side
Built-in 24" beverage fridge slot on right wing
Highest cost and complexity
Wine side faces the oven — check gas/elec clearance
💡 Best Value: Option C — Wide T-Shape
Keep the same 54" door opening in the kitchen wall but frame a wider box behind it — the pantry interior becomes ~8 ft wide by extending left and right along the garage wall. You don't need a bigger hole in the kitchen wall, just a bigger framed box in the garage. Both wings stay in dead space against the back of the garage wall. The result is dramatically more shelf space with the same entry door.
Creative Alternatives — Thinking Bigger
Options A–D are all variations of "bump into the garage." These five alternatives rethink the space entirely — from zero-construction cabinet solutions to full room build-outs. Some are cheaper than A–D; some are more expensive but dramatically more impactful.
OPTION E — Walk-Through Pantry
Butler's Pantry Corridor
Widen the passage between laundry room and kitchen into a pantry corridor with shelves on both sides. Groceries flow: car → garage → laundry → through shelved corridor → kitchen.
Cost: $2K–4K · Laundry: Unchanged · Garage: 0–18 sq ft
OPTION F — Full Pantry Room
Garage Room Build-Out (5' × 6')
Frame a real insulated room (5'×6') inside the garage with shelving on 3 walls, a staging counter, and overhead light. Door opens directly into the kitchen through the shared wall. Laundry untouched.
Stack the washer/dryer to free wall space. Add pantry shelving on the freed walls. Widen the passage to the kitchen into an open pass-through. Bench, hooks, counter all stay. Result: 0 garage impact, ~20 ft of pantry shelving.
Cost: $1.5K–4K · Garage: 0 sq ft · Laundry: Fully works (stacked)
OPTION H — Simplest: Add Shelves to Laundry
Pantry Shelves in Laundry Room (Nothing Moves)
Don't move anything. Add floor-to-ceiling shelving on the south wall and above the W/D. Cut a pocket door to the kitchen. Everything else stays exactly where it is. Weekend project.
Remove the old 12" pantry closet. Install modern floor-to-ceiling pull-out cabinets with spice rack, internal organizers, door-mounted storage. Match your maple cabinets. No structural work. Pairs with Option H for max storage.
Cost: $800–3K · Garage: 0 sq ft · Permits: None · Time: 1–2 days
Back Wall
14" deep shelves · 6 levels · full 54" width · great for canned goods, appliances, large containers
Side Walls
10" deep shelves · perfect for jars, spice overflow, snacks, boxed goods
LED Strips
Under each shelf · warm white 2700K · motion-activated switch at door · powered via existing outlet
How the pantry entrance looks from the kitchen — three door style options shown. Your kitchen has maple cabinets, white quartz counters, matte black hardware, and dark hardwood floors.
🚪 Barn Door
Slides flat against wall — no door swing into kitchen. Matte black hardware matches your faucet. Very on-trend with your design language.
🚪 Swing Door — Your Choice ✓
Matches your existing white 6-panel door style. Clean, classic look. Paint white to match kitchen trim. Ensure clearance against island/counter.
🚪 French Doors — Premium
Two doors, glass panels. Shows off the organized interior. More architectural — aligns with the library's built-in aesthetic. Higher cost.
Two views: the actual floor plan for reference, then a zoomed-in diagram of the pantry area showing expansion options.
📋
Key facts from the floor plan: The garage connects to the house through the laundry/mudroom (12' × 8'2") which has the washer, dryer, and built-in shelves. The pantry is on the kitchen's west wall (shared with the garage), between the laundry/mudroom entry passage and the oven. The laundry room is a key resource — it's ~98 sq ft of space adjacent to both the garage and the kitchen.
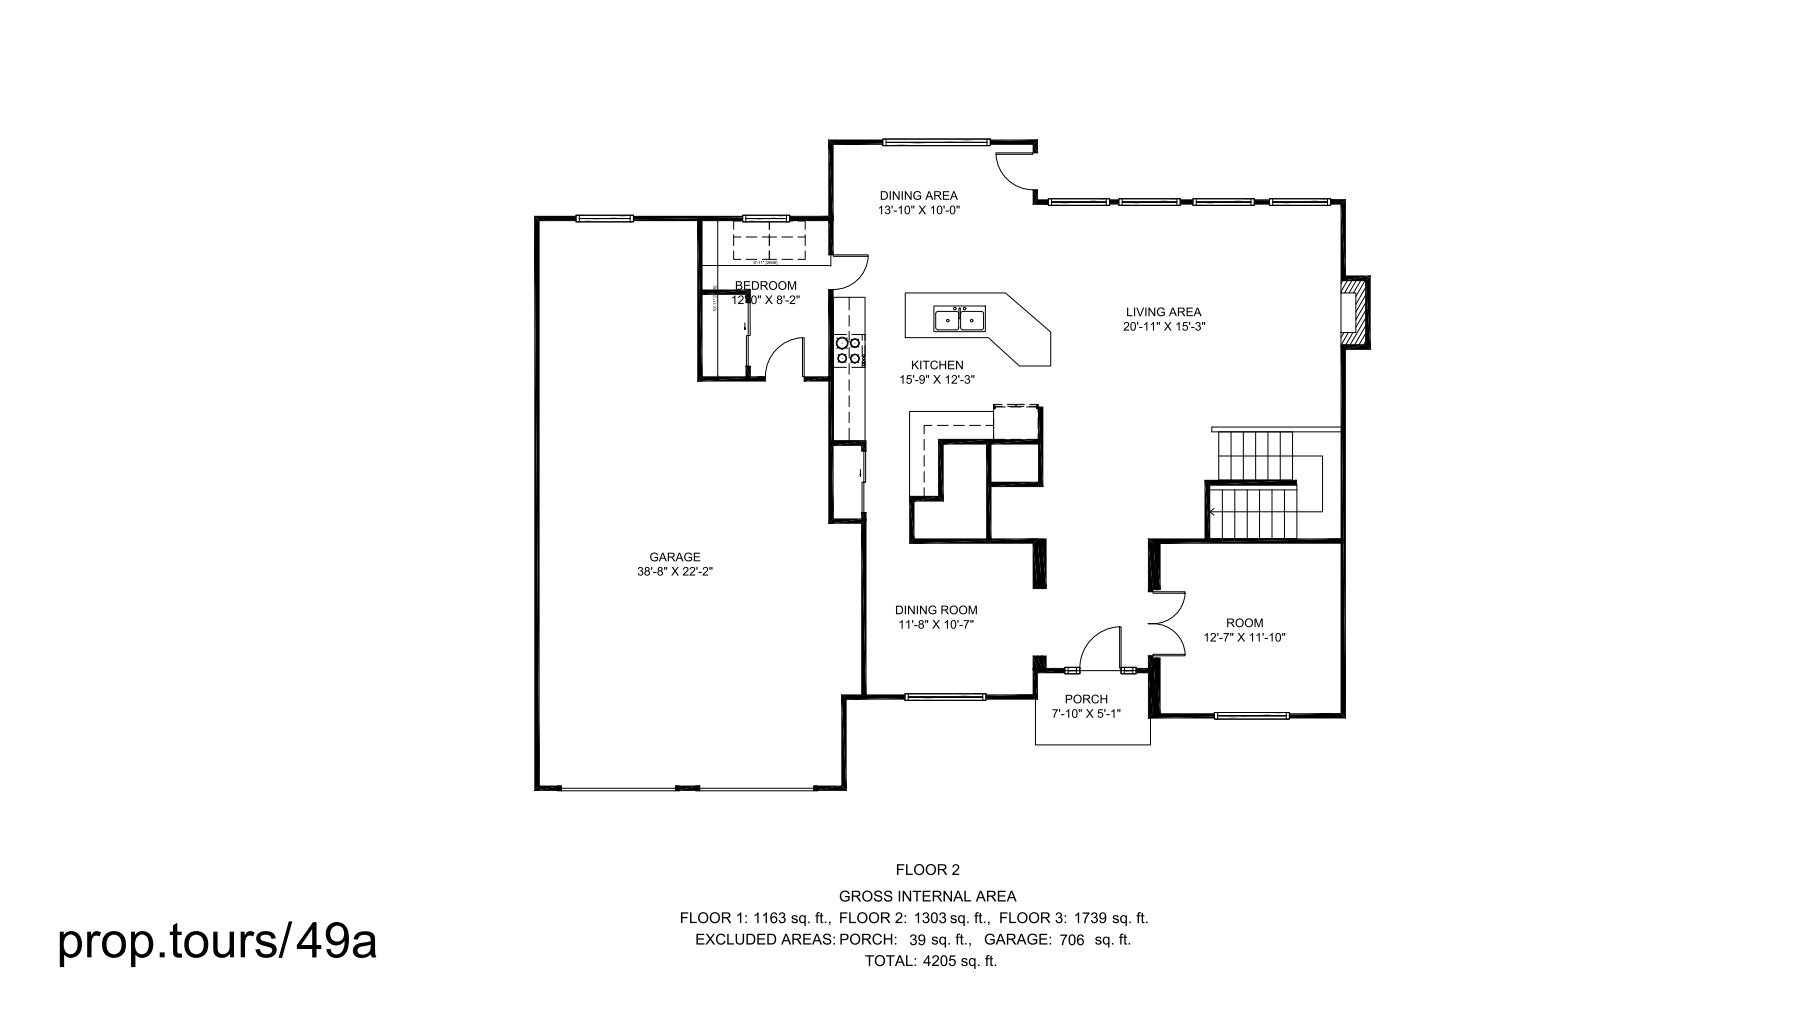
Floor 2 — Actual Floor Plan
The pantry sits on the west (left) wall of the kitchen, shared with the garage. The laundry/mudroom (12' × 8'2") is the room between the garage and the kitchen — the garage entry comes through it. The oven is below/south of the pantry on the same wall.
Pantry Zone — Zoomed In (Top-Down)
The shared wall runs left-to-right. Garage is above. Kitchen is below. On this wall from left to right: entry from laundry/mudroom, pantry, oven. The laundry room is shown at top-right for context.
Current pantry (12" deep, 54" wide)
Options A/B: simple bump-out
Option C: T-shape center + wings
Option G: Full mudroom + pantry room
Options G/H: Laundry room pantry integration
📐 Garage Footprint by Option
Option A — 54"W × 24"D: ~9 sq ft
Option B — 54"W × 36"D: ~14 sq ft
Option C — T-shape: ~22 sq ft
Option F — Room (5'×6'): ~30 sq ft
Option G — Stack W/D + shelves: 0 sq ft garage
Option H — Laundry shelves: 0 sq ft garage Options G/H use existing laundry room — zero garage impact
📏 Three Measurements to Take
1. Garage entry → pantry opening (left wing limit) 2. Pantry opening → oven gas/elec run (right wing limit) 3. Wall to nearest parked car (depth limit: 24" vs 36") These three numbers determine which options are feasible.
Shelf Heights (from floor)
Shelf
Height
Gap Above
Best For
Floor storage
0"
18" to S1
Large appliances, bulk water, dog food
Shelf 1
18"
18" to S2
Tall bottles, olive oil, wine
Shelf 2
36"
18" to S3
Cereal, tall boxes, pasta boxes
Shelf 3
54"
16" to S4
Canned goods, jars, condiments
Shelf 4
70"
16" to S5
Snacks, everyday items
Shelf 5
86"
16" to S6
Less-used items, backup stock
Shelf 6
102"
~18" to ceiling
Seldom-used, seasonal items
Shelf Depth by Wall
Side Walls — 10" deep
Single-row depth — ideal for cans, jars, and spice bottles. Keeps items visible at a glance. Both sides identical.
Back Wall — 14" deep
Two rows of cans or one row of large cereal boxes + one row behind. Use risers for back row visibility.
Total Shelf Linear Footage
Side shelves: 2 sides × 6 shelves × 10" = 120" (10 ft)
Back shelves: 6 shelves × 54" = 324" (27 ft)
Total: ~37 linear feet of shelf
Before you start: Pull a building permit for the structural modification. Parker, CO typically requires permits for wall openings. The Type X drywall on the garage side will be inspected — don't close the walls before inspection.
1
Utility Scan
Use a stud finder and voltage detector to scan both sides of the garage/kitchen wall. Mark any electrical runs, HVAC ducts, or plumbing. Photograph everything before touching it. Rerouting a duct adds $300–600 to the project.
⚠ Do this before permit application
2
Structural Check
Confirm the wall is non-load-bearing. Look in the attic for any posts or beams above the wall line. If any doubt — hire a structural engineer (~$300). Parker floor plans suggest this is a partition wall but verify.
🏗 Structural engineering letter may be required for permit
3
Pull Permit
Apply with the Town of Parker for a building permit covering: structural wall modification, framing, insulation, and drywall. Submit a simple sketch showing the expansion dimensions. Typical Parker residential permit: $150–300, 3–5 day approval.
📋 Required before any demo
4
Demo — Kitchen Side
Remove existing pantry contents and shelving. Cut drywall to expose studs. Remove the existing pantry door and door frame. Save the header if it's the right size for the new opening. Remove studs within the 54" opening, leaving king studs on each side.
5
Demo — Garage Side
Mark a 54"W × 84"H opening on the garage side. Cut through the existing drywall. You'll see the wall cavity and potentially insulation. Remove garage-side drywall in the expansion footprint (54"W × 36"D).
⚠ Type X drywall must go back on garage side — don't dispose of it yet if reusable
6
Build the Box (Framing)
Frame the 54" × 36" expansion bump-out using 2×4 studs at 16" O.C. Build three new walls: left side, right side, and back wall — all extending 36" into the garage. Add a top plate at the pantry ceiling height. Install a proper LVL or doubled 2×10 header over the 54" kitchen-side opening.
7
Insulate
Spray foam or R-15 batt insulation in all three new walls (left, right, back) and the ceiling of the expansion. This is critical in Colorado — pantry goods will freeze without it. Garage temps range from -10°F to 110°F seasonally.
⚠ Don't skip this — pantry food will freeze in winter
8
Drywall
Garage-side exterior: 5/8" Type X drywall (fire code). Interior pantry walls: 1/2" regular drywall. Kitchen-side opening: drywall returns to match existing kitchen wall thickness. Tape and mud all seams — texture to match kitchen.
📋 Inspection required before closing walls — call for rough-in inspection
9
Prime and Paint
Prime all new drywall. Paint the pantry interior in a light, bright color — white or soft cream makes it feel larger and items easier to see. Consider a semi-gloss finish for easy wipe-down of shelves and walls.
10
Install Shelving
Two options: (A) Adjustable wire shelving on standards (faster, cheaper, $150–300) or (B) Custom built wood shelves to match your kitchen's maple/white aesthetic (better looking, $400–800 materials). Install shelf pins or standards first. Build side walls at 10" depth, back wall at 14" depth.
11
LED Lighting
Run LED strip channels under each shelf — warm white (2700K) to match kitchen lighting. Connect to a switched outlet inside the pantry or use a motion-sensor switch at the door. Total LED run: ~40 feet. Use aluminum channels for a clean, diffused look.
12
Install Door
Hang a pre-hung 6-panel interior door (32"×80") in the opening with proper shims — this matches your existing white door style. Paint white to match kitchen trim. Verify swing clearance against the island/counter before installing hinges on the left vs right side. Install hardware to match existing interior hardware.
13
Trim and Finish
Install door casing to match existing kitchen molding profile. Add baseboard along the new walls. Caulk all transitions. Touch up paint.
14
Final Inspection
Call Parker Building Department for final inspection. Inspector will check: Type X drywall on garage side, header sizing, insulation, and general framing. Get the green tag before considering the job complete.
📋 Final inspection required to close permit
15
Organize!
Add wire baskets, lazy susans on back shelves, label bins, decant dry goods into clear containers. The 37 linear feet of shelf space will transform your kitchen workflow.
Option A estimate: $800–1,400 · Option B estimate: $1,200–2,000 · Option C estimate: $2,500–4,000DIY labor. Add 40–60% for contractor labor. Permit: ~$200. Structural engineer (if needed): ~$300.
Item
Spec
Qty
Est. Cost
Notes
Framing
2×4×8 studs
Douglas Fir
20
$80
New wall framing for bump-out
LVL beam / 2×10 header
54" span
2
$80
Over pantry opening — critical for load
King/jack studs
2×4×8
4
$16
At opening sides
Construction screws/nails
3" box nails
1 box
$20
Insulation
Batt insulation
R-15 3.5" · 15" wide
2 bags
$80
All three new walls + ceiling of bump-out — don't skip
Spray foam
Gap filler
2 cans
$20
Seal all penetrations
Drywall
Type X drywall 5/8"
4×8 sheets
6
$90
Garage-facing side — fire code required
Standard drywall 1/2"
4×8 sheets
10
$100
Pantry interior walls
Joint compound + tape
pre-mixed
1 bucket
$30
Corner bead
metal
4 pcs
$15
Texture spray
orange peel
2 cans
$25
Match existing kitchen texture
Shelving
Shelf boards 1×12
pine, 8 ft
12
$180
Back wall shelves at 14" depth, cut to width
Shelf boards 1×10
pine, 6 ft
12
$130
Side wall shelves at 10" depth
Shelf pins + standards
adjustable
4 strips
$40
Allows adjusting heights later
Wood primer + paint
white semi-gloss
1 gal
$45
Wipe-clean finish for pantry shelves
Lighting
LED strip kit
2700K warm white · 16 ft roll
3
$90
Under each shelf — one per shelf level
LED aluminum channels
diffuser included
12
$60
Clean, diffused look vs bare strips
Motion switch
in-wall
1
$30
Auto-on when door opens
LED power supply
12V 5A
2
$40
Door — White Swing Door (Your Choice)
Pre-hung interior door
6-panel, 32"×80", primed
1
$120–200
Match existing white 6-panel style — paint to match kitchen trim